







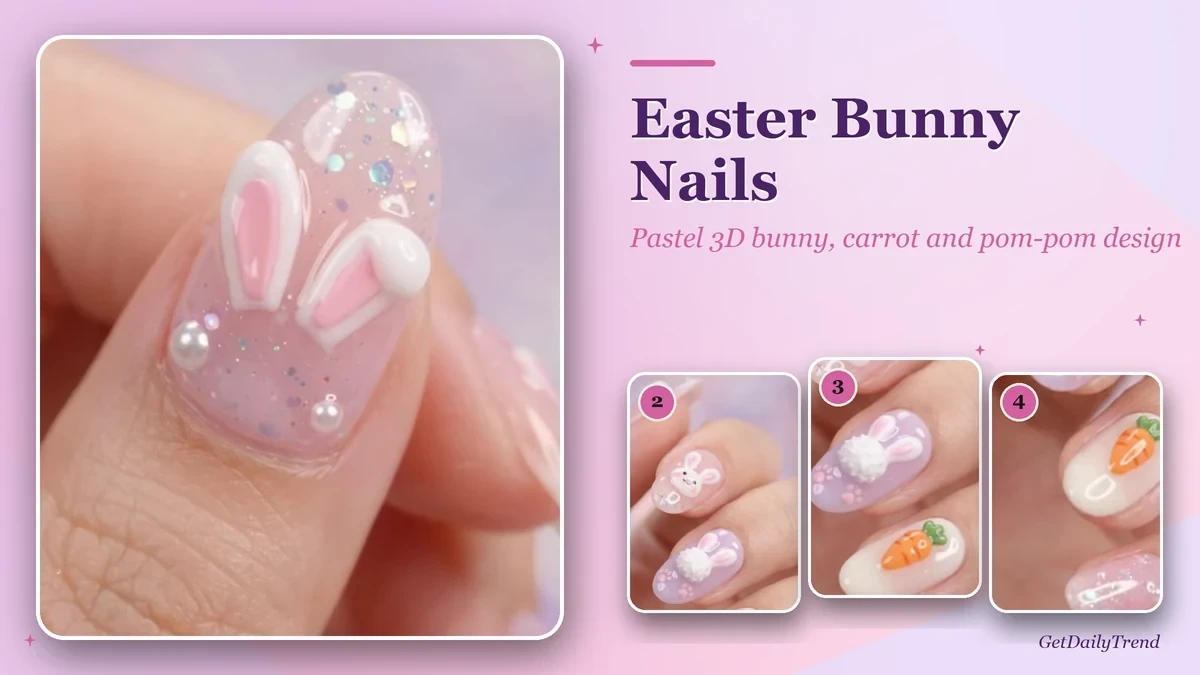
Easter bunny nails are one of the cutest spring manicures you can wear, and the video behind this guide shows a complete set: a white 3D bunny face, a lilac bunny seen from behind with a fluffy pom-pom tail, a cream nail with a bright orange carrot, a glossy sheer pink nail, and a close-up of a glittery nail topped with two raised bunny ears and a pair of pearls.
This is a design guide, not a classic tutorial. The clip is a short showcase with no spoken instructions: it shows the finished manicure turning slowly in the light and then zooms in on one nail. We therefore describe what is visible, frame by frame, and we do not invent the application steps, the products or the curing times that the video never shows. Our editorial policy explains how we separate what we can see from what we suggest.
Because the footage focuses on the result, this guide is useful in a different way. It helps you read the design: which element sits on which finger, which colours and textures are used, how the set stays balanced, and how to adapt each idea to your own nails and your own level. Every picture below is a frame taken from the video, so you can compare the description with the real thing.
Key takeaways
- These Easter bunny nails mix five ideas: a bunny face, a bunny from behind with a pom-pom tail, a 3D carrot, a plain glossy accent and a glitter nail with raised bunny ears.
- The palette is soft and pastel: sheer pink, milky cream, translucent lilac, white, pale pink and a single pop of orange and green for the carrot.
- Texture does the work: the ears, the carrot and the tail all stand out from the nail, while the pearls and the glitter add a quiet sparkle.
- The video does not show how the 3D elements are made or fixed, which products are used or any curing time, so follow the instructions of your own products and lamp.
- Not every nail needs a character. The plain glossy pink nail gives the eye a place to rest and keeps the set wearable.
Contents
Quick answer: what do Easter bunny nails look like?
Easter bunny nails combine soft pastel colours with small 3D motifs: a white bunny face with pink inner ears, a lilac nail with a bunny from behind and a fluffy white tail, a creamy nail with an orange carrot, and a sheer glitter nail with two raised white-and-pink bunny ears, finished with a few pearls.
What these Easter bunny nails look like
The set is built on medium-length, softly rounded almond-style nails with a very glossy surface. The base colours are all sheer or milky: a translucent baby pink, a clear lilac and a creamy off-white. Nothing is opaque or heavy, which gives the whole hand a fresh, light look against the pastel bokeh background used in the video.
Each finger carries a different character, yet the set feels like one family because the palette stays soft and every motif is white, pink or lilac apart from the carrot. The raised white shapes are the signature of the design. On the index finger the bunny face is white with small pink ears, two dark dots for eyes and a tiny pink nose and cheeks. On the middle finger the bunny turns its back and shows a round, fluffy white tail with two pink-lined ears and tiny pink paw prints scattered around it.
The ring finger breaks the pattern with a cream nail and a single bright orange carrot with a green top and a glossy highlight. The little finger keeps a sheer, glossy pink with a fine shimmer and no motif. Right at the edge of the frame, the thumb carries a small white pom-pom on a glossy pink nail. The video then moves in close on one nail: a transparent pink base filled with holographic glitter flakes, two white bunny ears with pink centres standing up from the nail, a small white bulge where one ear bends over, and two pearls at the lower left.
Why this pastel design works
The designer plays with three simple contrasts. Smooth against raised: the nail surface is flat and shiny while the motifs have volume. Soft against bright: the pastel base makes the single orange carrot look like a deliberate focal point. Busy against calm: three decorated nails, one carrot nail and one plain nail keep the hand from looking crowded. This balance is what makes Easter bunny nails look cute without becoming childish.
Materials and tools for Easter bunny nails
The video never shows a tool or a product, because it only presents the finished manicure. Everything we can list as visible is therefore a colour, a shape or a decoration on the nail. The list of tools is our own suggestion, based on what the design needs, and we mark it as such.
Visible in the video
- Translucent pink, lilac and milky cream nail colours with a very glossy finish.
- White raised bunny shapes with pink inner ears, on the index and middle fingers.
- A fluffy white round pom-pom tail, on the middle finger and, smaller, on the thumb.
- A raised orange carrot with a green top, on the ring finger.
- Holographic glitter flakes and fine shimmer on the clear pink nails.
- Two small pearls on the close-up nail.
- Tiny pink paw prints around the lilac bunny.
Suggested additions (not shown in the video)
- A nail prep set to shape the nail and clean the surface before you start.
- Fine detail brushes and a dotting tool for eyes, cheeks and tiny paw prints.
- Pick-up tweezers or a pointed tool to place small decorations and pearls.
- A pastel palette, with white, pink, lilac and cream to hand.
- A finishing layer suited to your product type, used as its instructions say.
- Ready-made 3D decorations as an alternative if you prefer not to sculpt your own.
Materials checklist
- Sheer pink, translucent lilac and milky cream colours
- White and pink for the bunny faces and ears
- Orange and green for the carrot
- Fluffy white pom-pom or similar soft decoration
- Holographic glitter flakes and fine shimmer
- Small pearls
- Fine detail brushes and a dotting tool
- Pick-up tweezers or a pointed tool
- Lamp that matches your products
- Finishing layer that matches your product type
Preparation before you start
Raised designs ask for a clean, even base. A glossy sheer colour shows every bump, and small decorations need a stable surface to sit on. In the video the nails are smooth, evenly shaped and the same length, which helps the motifs look neat.
- Shape the nails evenly. The video shows medium, softly rounded almond-style nails. A similar shape suits bunny ears and carrots, which need a little space around them.
- Plan which nail gets which motif. In the video, each finger has its own character and one finger has none. Sketch your five nails on paper before you decide.
- Follow your own products and lamp. The video does not show any product, so rely on the instructions of the ones you use and make sure each layer is fully set before you add the next.
- Prepare decorations in advance. Put small pearls and glitter in a tray so they do not roll away.
- Keep your hands steady. Rest your hand on a firm surface when you work on tiny details such as the eyes or the paw prints.
The Easter bunny nails design tour: six frames from the video
The six cards below follow the order of the video, from the full hand to the close-up. Each card shows the frame we used, what is visible in it and a tip based on the design. The tips are our suggestions, since the video does not show how any element is made.
The full manicure at a glance
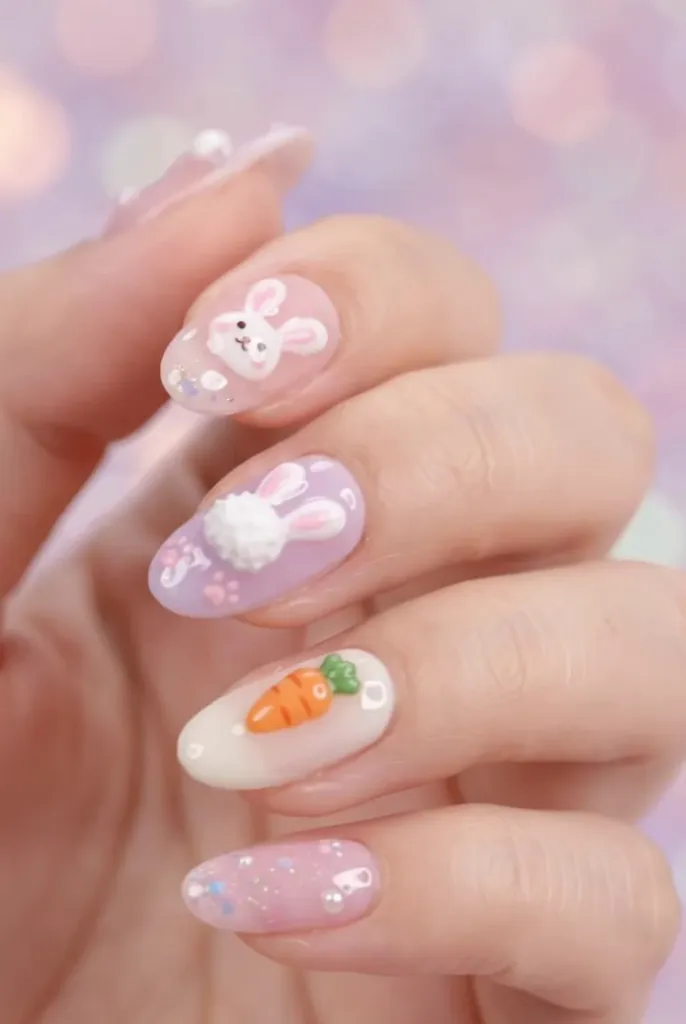
The first frame shows the whole hand against a soft pastel background full of light bokeh. From the index finger down you see the white bunny face, the lilac nail with the bunny and its pom-pom tail, the cream nail with the carrot and the sheer glossy pink nail on the little finger. At the top edge, the thumb carries a small white pom-pom. This overview is the best way to see how the set is balanced: three motifs, a plain nail and a soft pom-pom accent.
Design tip: squint at your own hand and check that the colours alternate. Pink, lilac, cream and pink again avoid two similar nails sitting side by side.
Watch out for: putting a character on every finger. The plain nail in the video is part of the design, not an omission.
The white bunny face on sheer pink
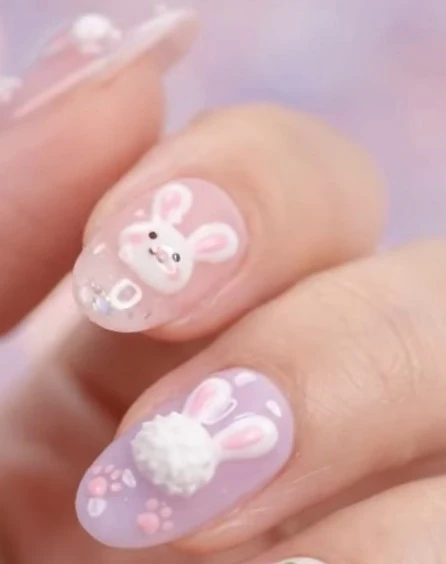
The second frame is a close view of the index finger. A white bunny face with two small ears, pink inside, sits at the centre of a sheer pink nail. Two dark dots make the eyes, a tiny pink nose and soft pink cheeks give it its expression, and small clear glitter flakes gather near the lower edge. The face is raised, so it catches the light on its rounded edges. The soft pink base is almost transparent, so the white face looks even brighter.
Design tip: keep the face small and slightly off-centre. A little empty space around it lets the glitter show and makes the nail look lighter.
Watch out for: oversized eyes or a heavy outline. In the video the expression is tiny and quiet, which is why it looks sweet.
The lilac bunny seen from behind
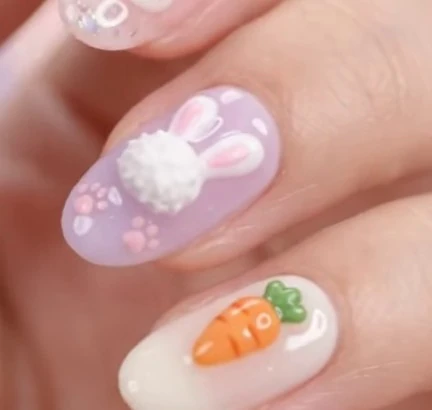
The third frame shows the middle finger in a translucent lilac, with a bunny facing away from us. Two white ears lined in pink lean to the right, and a round, fluffy white tail sits below them like a small cotton ball. Tiny pink paw prints are scattered around the lower left, as if the bunny had just hopped across the nail. The carrot nail is visible just below it, which shows how well lilac and cream sit together.
Design tip: place the paw prints in a loose diagonal line with different sizes. A straight row would look stamped rather than playful.
Watch out for: a tail that is too large for the ears. In the frame the tail and ears stay in proportion, which keeps the bunny readable.
The orange carrot on a milky cream nail
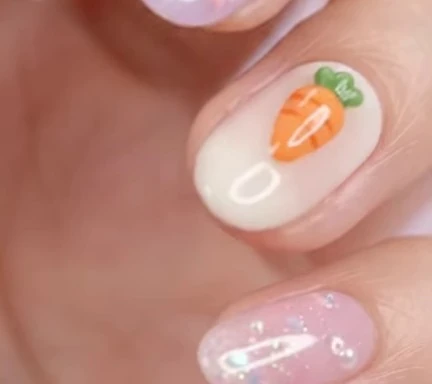
The fourth frame focuses on the ring finger: a cream, slightly milky nail with a raised orange carrot, a leafy green top and a soft glossy highlight that suggests volume. The carrot is the only strongly saturated colour in the whole set, which makes it the visual accent. Just beneath it, the little finger shows the plain sheer pink nail with a faint shimmer and a bright reflection along the length.
Design tip: when you work with a single bright colour, keep every other nail pastel, as the video does. The carrot then looks intentional rather than loud.
Watch out for: adding extra colours around the carrot. The cream background is what lets it stand out.
The close-up: raised ears on glitter
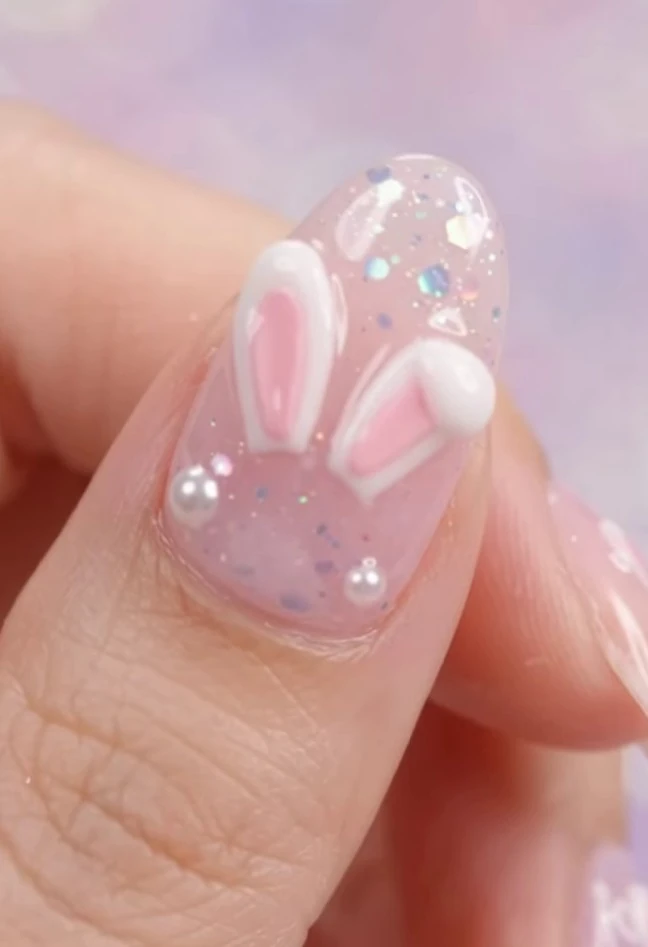
The fifth frame is the video’s close-up on a single nail. Over a transparent pink base filled with round and hexagonal holographic flakes, two white bunny ears stand up from the nail, each with a pink centre. One ear bends over at the tip and forms a small white bulge, which gives the impression of a floppy ear. A pearl sits at the lower left. The nail is shiny and the ears look soft rather than hard.
Design tip: let one ear stand straight and the other bend. That small asymmetry is what gives the bunny its personality.
Watch out for: ears that are too tall. On a short nail, scale them down so they do not catch on fabric or hair.
Pearls and sparkle to finish the look
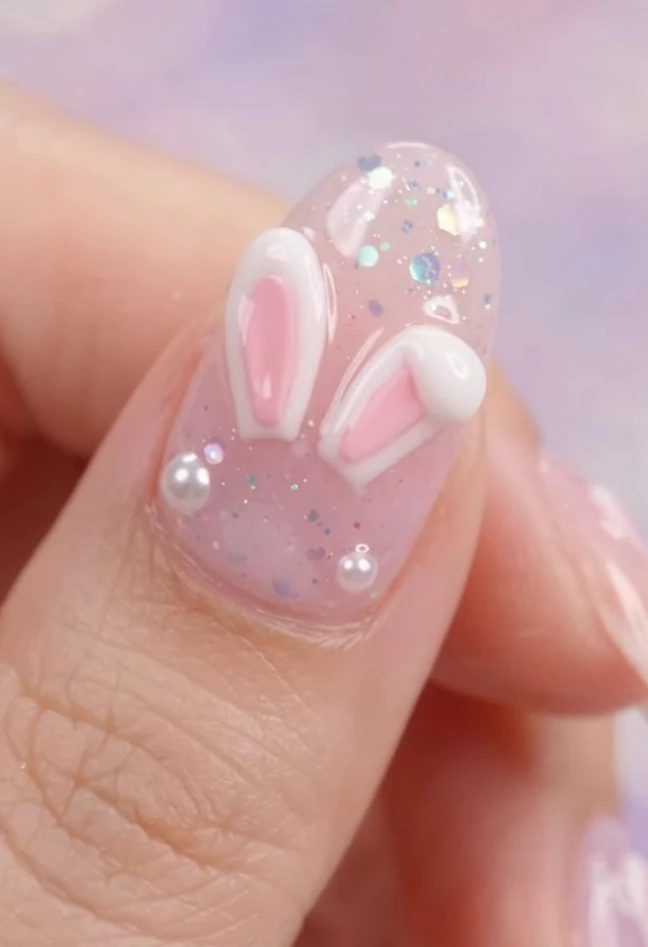
The last frame shows the same nail from a slightly different angle. Two small pearls, one a little larger than the other, rest at the lower left of the nail among the glitter, and the ears show their white outline and pink inside very clearly. The pearls echo the white of the bunny, while the holographic flakes catch the pastel light. The video does not show how the pearls are fixed, so follow the instructions of your own system when you add them.
Design tip: use two or three pearls of different sizes, grouped on one side. A balanced but not symmetrical placement looks more natural.
Watch out for: covering the whole nail with decorations. Leaving clear glitter visible keeps the nail looking light.
Pro tips for cleaner Easter bunny nails
- Keep the base sheer. A translucent pink, lilac or cream makes the white motifs pop, and it is more forgiving to wear as the nail grows.
- Use white sparingly. The bunny shapes work because white is only used for the motifs, not for the whole nail.
- Give each nail its own character. A face, a bunny from behind, a carrot and a plain accent keep the hand interesting without repetition.
- Decide on one bright colour. The orange carrot is the only saturated shade, so it becomes the focal point.
- Match the scale to your nails. If your nails are short, make every motif smaller and use fewer pearls.
- Check in natural light. Pastel colours and holographic glitter look different under a lamp and in daylight.
Creative variations (our suggestions, not shown in the video)
The video shows one set. The ideas below are suggestions inspired by the same palette and motifs.
- A single bunny accent. Keep all nails sheer pink and add one bunny face on the ring finger for an everyday version.
- Pastel yellow and mint. Swap the lilac for butter yellow or mint to give the Easter bunny nails a different spring mood.
- A matte finish. A soft matte finish on the base colours makes the glossy motifs stand out even more.
- Chick or egg motifs. For a wider Easter theme, replace the carrot with a small chick or a speckled egg.
- Tiny bunny ears on every nail. For a subtler idea, add only a pair of small ears at the cuticle of each nail.
- Short-nail version. Use one small motif per hand and keep the rest of the set plain and glossy.
Care and safety
Nail products can contain ingredients that call for careful use. The U.S. Food and Drug Administration (FDA) reminds consumers to read the labels of nail products and to follow the warnings, and notes that some ingredients can be harmful if swallowed and that some can catch fire near heat. Its page on nail care products is worth reading before you start.
If you do your nails often, the U.S. Occupational Safety and Health Administration (OSHA) describes the chemical exposures that nail technicians face, a useful reminder to work with good ventilation and to follow the safety information of your products. See its overview of health hazards in nail salons.
- Follow your own products and lamp. Curing requirements vary from one product to another, and the video does not state any, so neither do we.
- Keep products away from heat and flames. Close the bottles after use and store them away from heat.
- Stop if your skin reacts. If you notice irritation, remove the product and consult a qualified professional.
- Keep decorations away from children and pets. Pearls and small charms can be a choking hazard.
- Mind raised designs in daily life. Tall ears and 3D shapes can catch on hair and fabric, so check the edges and consider a lower profile for everyday wear.
- Remove the design gently. Use the removal method recommended for your product instead of peeling the artwork.
Easter bunny nails: frequently asked questions
What do Easter bunny nails look like?
In the video, Easter bunny nails mix sheer pastel colours with small raised motifs: a white bunny face, a lilac bunny with a fluffy pom-pom tail, an orange carrot on a cream nail, a plain glossy nail and a glitter nail with two bunny ears and pearls.
Does the video show how the bunny nails are made?
No. The clip shows the finished manicure and a close-up, with no application steps. We describe only what is visible and mark every tip and variation as our own suggestion.
Which colours are used in this design?
Sheer baby pink, translucent lilac and milky cream, with white for the bunnies, pink inside the ears and a single bright orange and green carrot. Holographic glitter flakes and pearls add sparkle.
How many nails carry a motif?
Four of the five visible fingers carry a motif or a pom-pom, and the little finger is left plain and glossy. The plain nail keeps the set balanced.
Can I wear this design on short nails?
Yes. The video shows medium, softly rounded nails, but on shorter nails you can scale every motif down and use fewer pearls and a single character per hand.
What can replace the carrot?
As suggestions, try a small chick or a speckled egg for a wider Easter theme, or keep a plain cream nail so the set stays quiet.
Are 3D nail designs practical for everyday wear?
Raised designs can catch on hair and fabric. As a suggestion, keep the motifs small, check the edges and consider a lower profile on your most-used fingers.
Are nail products and lamps safe to use at home?
Nail products are regulated as cosmetics and should be used as directed. The FDA advises reading labels and following warnings, and notes that some ingredients are harmful if swallowed or can catch fire near heat. Follow the instructions of your products and lamp, keep small decorations away from children and pets, and stop if your skin reacts.
Conclusion: Easter bunny nails, a soft spring set built on small details
The video does not show how the manicure is made, but it shows very clearly what makes it work: a sheer pastel base, a white bunny face, a lilac bunny with a pom-pom tail, a single orange carrot, a plain glossy accent and a glitter nail with raised ears and pearls. Pick the motifs you like, keep one nail calm, and let the pastel palette tie the set together.
If you enjoy seasonal designs, continue with our Halloween toe nails ideas for ghost and pumpkin pedicure designs, learn how to pick the right outline with the nail shape guide, or explore a darker palette in our dark red toe nails ideas. More nail art guides are published regularly on GetDailyTrend.
Sources, all consulted on 7 November 2026: FDA, Nail Care Products · OSHA, Health Hazards in Nail Salons.